Showing posts with label guides. Show all posts

Dota 5vs5 line ups

This are some of the list of characters which is suited in Team Play in Dota
1.Sven (front liner)
2.Vengeful Spirit (switching)
3.Kardel Sharpeye(feeder and pusher)
4.King Leoric Tweet This

Dotadiktus Consecutive Kills

Consecutive kills

When one player kills a number of players without dying they get a 'bounty' on their head. The more players killed before dying the higher that bounty gets. Players are alerted in the game via sound. When someone finally kills that player they receive the bounty gold in addition to the regular 100 gold for killing a hero.


Kills Sound Bounty
 3 Killing Spree 50
4 Dominating 100
5 Mega-Kill 150
6 Unstoppable 200
7Wicked Sick 250
8 M-m-m-m....Monster Kill 300
Godlike 350
10+ Beyond Godlike/Holy Shit (somebody stop/kill him!) 400
Tweet This

Dota-Allstars Country abbreviations

Country abbreviationsPlayers will talk about where a players is from via their country abbreviation (and in particular a program known as 'banlist' uses this terminology).


Abreviation Country
SG/SING Singapore
MY/MSIA Malaysia
BR/BRA     Brazil
PH/PINOY Philippines
AU Australia
CAL California,USA
TW Taiwan
HK     Hong Kong
CA     Canada
EU Europe
SK/SVK Slovak
CZ     Czech
EE     Estonia
NZ New Zealand
BR Bulgaria


Tweet This

Dota Teminologies / GG Online Chatting

Dota Teminologies / GG Online Chatting

TermDescription
afk away from keyboard
bbbye bye
bbl be back later
brb be right back
bs backstab (an ambush)
buff make something better (an ability, stats, items etc)
dw dont worry
gj good job
gl hf good luck, have fun
gwgood work
imba imbalanced
lol laughing out loud
nerf make something worse (an ability, stats, items etc)
nm nvm = never mind
ppl people
b back = retreat
bkb black king bar
dd doubledamage
dmg damage
dota defense of the ancients(ofcourse !!)
eos eye of skadi
fend defend
gg good game
ks killsteal (are you?)
mkb monkey king bar
pub public = public game
rax barracks, if yours is destroyed the opposing team's creeps gets a
regen regeneration
rm remake
ror ring of regenation
ulti a hero's ultimate spell
ilu     illusion
roh ring of health
rapier /divine divine rapier ( weapon that adds 250 damage )
bd backdoor
push concentrating on towers
Feeder An ally who repeatedly dies to enemy granting opponents gold and experience points making them stronger as a result
gank ganging
Leech standing safe distance from attacks and gaining exp without combat
Nuke Magical / "Physical" spells / ability that require casting which is used to hurt a enemy hero
owning Killing enemy heros repeatedly.
buriza buriza-do-kyanon
sheep / tupa ick = guinsoo's scythe's of vase
aga aghanim's sceptor
de demon edge
linken     Linken's sphere
hot heart of tarrasque
sny sange and yasha
euls eul's sceptor of divinity
leave a comment if you have some more suggestion xD imba D Tweet This

Dota-Allstar Hero Experience Chart

Experience needed to level
Experience table
Lvl Total Exp Exp TNL
10200
2200300
3 500400
4 900500
5 1400600
6 2000 700
7 2700800
8 3500900
9 44001000
10 54001100
1165001200
12 77001300
13 90001400
14  104001500
15 119001600
16 13500 1700
17 152001800
18 170001900
19 189002000
20 209002100
21 230002200
22 252002300
23 275002400
24 299002500
25 324002600

Legend:

Lvl Current Level
Total Total experience needed to reach level
Exp TNL Experience to next level from current
Tweet This

Dota-Allstars Juking Guide

After the recent nerf of the Kellen Dagger of Escape , one thing for sure. There's no longer such easy mechanism to escape from ganking. We must now depends on our brain and our skills. And basically, there is two skills to avoid death from ganking. That is Juking and Warding.

This post will focused on how to Juking and show some spot for juking. I will cover warding on the another post. Ok, let's get the idea. Maybe some of you still wondering, what Juking is. Generally, Juking is a way to fool and trick your enemies when they are chasing you. Successfull jukes will make the enemies to hit their spell in the wrong place, lose a step when chasing you or even lost their sight on you.

The most important thing on juking is to make the enemies move into the wrong direction. When the enemies got tricked, you can quickly use a Town Portal or escaping to other direction. There's several way to do that. The most easiest way but yet not too effectice against pro player is sudden change of direction. By suddenly move to different way will make the enemies lose a step. But a pro player is rarely got tricked by this one.

Another way is by using some hiding path to make the enemies lose their sight for while. This is very usefull and used in many high level games. To effectively use this trick, there is some common juking path you must know. Below is several place that used really often for juking the enemies.

This one is in the middle of Scourge tower. Use it to hide or even escaping from chaser hero like Dark Stalker when they come to your tower.


Above is in the top tower of the Scourge.


This one is on the near top tower of the Scourge. Use this to juking around when the enemies chase you.


This one is in the bottom tower of the Sentinel. Very usefull to escaping from the death :D


You can also use this to fleeing from chaser.


This is placed on the middle Sentinel tower. Very usefull for juking or even for Pudge hiding place before hooking.


The last picture, can you guess where it is? Yes, this is on the left side of Sentinel tower.
Tweet This

Dota-Allstars Spell Resistance Guides

Spell resistance in DotA is a beautiful thing. It lets you take more of those nasty nukes flying towards your face and last longer in the battlefield.

They're offered in three flavors:
Cloak of the Planeswalker, which gives 15% more resistance
Hood of Defiance, which gives 30% more resistance (among other things)
and three skills from heroes.

Now, how do we stack resistance?
1. If you do not have a spell resistance skill, you can either buy a Cloak or assemble a Hood and that's that. That's as high as it will ever go. Second Hoods and/or Cloaks will not offer additional bonuses to your resistance.

2. If you have a spell resistance skill, you may assemble the spell resistance item whenever you want. Previously (prior to 6.47), there was an issue with stacking spell resistance, but it is no longer an issue. So let me repeat that -- Item whenever you want, skill whenever you want.

Spell Resistance Stats from highest to lowest
===================================================
Heroes without spell resistance skills:

No Items: 25%
Cloak only: 36.25%
Hood only: 47.5%

===================================================
Anti-Mage:
Spell Shield level 4 gives 40% more spell resistance

No Items and skills: 25%
Cloak only: 36.25%
Hood only: 47.5%
Spell Shield only: 55%
Cloak and Spell Shield stacked: 61.75%
Hood and Spell Shield stacked: 68.5%
===================================================
Netherdrake:
Corrosive Skin level 4 gives 20% more spell resistance

No Items and skills: 25%
Cloak only: 36.25%
Corrosive Skin only: 40%
Hood only: 47.5%
Cloak and Corrosive Skin stacked: 49%
Hood and Corrosive Skin stacked: 58%

===================================================
Pudge:
Flesh Heap level 4 gives 16% more spell resistance

No Items and skills: 25%
Cloak only: 36.25%
Flesh Heap only: 37%
Cloak and Flesh Heap stacked: 46.45%
Hood only: 47.5%
Hood and Flesh Heap stacked: 55.9%
===================================================

Appendix A: Formula
How to calculate for the spell resistances:

A.) 2 Sources
This is for heroes without resistance skills or the 3 that do have it but do not choose to stack

Spell Resistance = (1 - (1 - S1) * (1 - S2)) * 100

The first source (S1) will always be your natural resistance of 0.25. The second source (S2) will be 0.15 for Cloak, 0.30 for Hood, 0.4 for Spell Shield, 0.2 for Netherdrake and 0.16 for Flesh Heap.

Example: Any hero with Hood

S1 = 0.25
S2 = 0.30
Spell Resistance = (1 - (1 - 0.25) * (1 - 0.30)) * 100
Spell Resistance = (1 - (0.75) * (0.70)) * 100
Spell Resistance = (1 - 0.525) * 100
Spell Resistance = 0.475 * 100
Spell Resistance = 47.5%

B.) 3 Sources
This is for Magina, Netherdrake and Pudge if they choose to stack an item with their resistance skill.

Spell Resistance = (1 - (1 - S1) * (1 - S2) * (1 - S3)) * 100

The first source (S1) will always be your natural resistance of 0.25. The second source (S2) will be 0.15 for Cloak or 0.30 for Hood. The third source (S3) will be 0.40 for Spell Shield, 0.20 for Corrosive Skin and 0.16 for Flesh Heap.

Example: Netherdrake with Cloak and Corrosive Skin

S1 = 0.25
S2 = 0.15
S3 = 0.20

Spell Resistance = (1 - (1 - 0.25) * (1 - 0.15) * (1 - 0.20)) * 100
Spell Resistance = (1 - (0.75) * (0.85) * (0.80)) * 100
Spell Resistance = (1 - (0.6375) * (0.80)) * 100
Spell Resistance = (1 - 0.51) * 100
Spell Resistance = 0.49 * 100
Spell Resistance = 49% Tweet This

Dota-Allstars Triggered Spells Guides

Triggered Spell Attack and Damage Type Table


The way this works is that all triggered damage has two properties: attack type and damage type (well, all damage really does, but this is beside the point). Attack type is used by armor classes and includes Hero, Siege, Piercing, Normal, Spells, etc. Damage type is not actually used for calculating damage but more for determining if and how the target will be damaged. There are three main classes of damage types: Physical, Magical, and Universal.

Some common Damage Types used in DotA are Normal (physical and reduces damage based upon armor) and Magic (magical and is unaffected by armor). Most damage types other than those two seem to be Magical, although there are some that are not, but Normal seems to be the only one that applies armor. Magic immune units cannot be damaged by abilities that use a magical damage type, but magical immunity makes no difference for the Spells damage type.

In short, for all practical purposes here, hero spell resistance will only be applied when the attack type is Spells. Armor will only be applied when the damage type is Normal.

Other important notes is that all damage done with Damage type Normal is considered physical, melee damage. This means that effects such as Centaur's Return and Lich's Frost Armor and items such as Blade Mail and Stout Shield will trigger off of this damage, even if the source of the damage is ranged.

This alphebetized list is provided as a reference to the damage reduction of each spell, along with some random notes about how the spells work.

All of this data was taken in 6.19 but should still hold true unless anything has been changed, and includes all of the heroes that deal damage directly through triggers. This list can help you counter or take advantage of certain abilities and help you with what to buy to help against some spells (For example, don't buy Aegis for spell damage reduction against Rupture). If you think I left something out, that some information is incorrect or requires clarification, or that a section is outdated, feel free to post it; I could've very easily missed something or made a mistake.

Acid Spray (Alchemist)

* Attack type Spells, Damage type Normal

Adaptive Strike (Morphling)

* Attack type Hero, Damage type Normal
* Adaptive Strike deals damage if Morphling's agility is greater than his strength, stun and knockback if his strength is greater than his agility, and both if they are equal.

Arcane Orb (Obsidian Destroyer)

* Attack type Hero, Damage type Magic

Backstab (Stealth Assassin)

* Attack type Hero, Damage type Normal
* Illusions play the graphic of Backstab, but deal no damage.
* Backstab will activate if the directions that the Stealth Assassin and his target are facing are within 105 degrees of each other.

Blink Strike (Chaos Knight, Phantom Assassin, Stealth Assassin)

* Attack type Normal, Damage type Normal
* Blink Strike deals the damage as stated, moves the caster to the position of the target, and tells the caster to attack the target. If the target is allied, there is a small pause added, the script deals no damage, and the caster is not issued an order.

Brain Sap (Bane Elemental)

* Attack type Hero, Damage type Magic
* Brain Sap heals Atropos for the full listed amount, even if the target had less HP than that amount.

Chaos Bolt (Chaos Knight)

* Attack type Spells, Damage type Magic
* Chaos Bolt deals a random amount of damage from 1 to 200 at all levels.

Counter Helix (Axe)

* Attack type Hero, Damage type Normal
* This passive deals full damage when triggered by illusions.
* AoE of 300

Culling Blade (Axe)

* If the target is at 300/450/625 HP or less, then Culling Blade deals 100000000 damage with Attack type Normal, Damage type Normal.
* Otherwise, its damage is by default Attack type Spells, Damage type Magic

Death Coil (Lord of Avernus)

* Self-damage has Attack type Hero, Damage type Magic
* Damage to enemies has Attack type Spells, Damage type Magic

Desolate (Spectre)

* Attack type Hero, Damage type Divine (Magical)
* Will activate if the attacked hero has no allies within 900 disance, including other heroes, creeps, summons, or illusions (but not towers).

Diabolic Edict (Tormented Soul)

* Attack type Spells, Damage type Normal
* This spell deals damage equal to 12.5 times the level of the spell to a random target within 500 of the caster ever quarter second.

Dispersion (Spectre)

* Attack type Hero, Damage type Magic
* Dispersion has a damage cap of Mercurial's max HP.
* The stun lasts 0.5 seconds on creeps, 0.01 seconds on heroes.
* AoE of 400.

Double Edge (Centaur Warchief)

* Attack Type Spells, Damage Type Fire

Elune's Arrow (Priestess of the Moon)

* Attack type Spells, Damage type Magic

Empowering Haste (Spirit Breaker)

* Attack type Hero, Damage type Normal
* This passive deals full damage when triggered by illusions and affects towers.

Enrage (Ursa Warrior)

* Attack type Hero, Damage type Normal

Fatal Bonds (Warlock)

* Attack type Spells, Damage type Magic
* This refers to damage dealt by Fatal Bonds due to damage received by linked units.
* Damage dealt to linked units is capped at the current HP of the unit receiving damage.
* Units with 1 HP will not take damage from Fatal Bonds

Fiend's Grip (Bane Elemental)

* Attack type Spells, Damage type Mind (magical)
* This is the damage the caster does to himself, not the damage done to the target (which is also, by default, Spells type damage).

Glaives of Wisdom (Silencer)

* Attack type Hero, Damage type Divine (Magical)

Greater Bash (Spirit Breaker)

* Attack type Spells, Damage type Unknown (Universal)
* Although this spell gains very little damage, each point into Greater Bash is effectively about another 0.2 seconds of the target being 'stunned.'

Gravekeeper's Cloak (Necro'lic)

* Attack type Hero, Damage type Magic
* This passive works in that whenever the hero is damaged, no matter what the source and even if he is killed, all units within 400 area of effect with the Gravekeeper's Cloak buff will take the listed amount of damage.
* This passive does not work when over 1400 damage is done to the hero at once. This is to prevent a spell such as Axe's ultimate, which deals a huge amount of damage when its target is under the amount of life listed, from obliterating all nearby units.
* This passive also reduces the damage done to the Visage whether or not any units are around, although, because it works much like the Bristleback's passive, it will not fully reduce an amount that is greater than Visage's missing HP.

Gush (Tidehunter)

* Attack type Spells, Damage type Cold (Magical)
* Yes, Gush's damage is trigger based.

Impetus (Enchantress)

* Attack type Hero, Damage type Divine (Magical)
* This spell's damage, as of 6.34, is determined by the positions of the caster and the target when the projectile hits, not when it's cast.

Kraken Shell (Tidehunter)

* All negative buffs are cleared from the hero every 10 game-time seconds after Kraken Shell is learned.

Laser (Tinker)

* Attack type Hero, Damage type Magic
* It now does deal precise damage against everything except fortified armour. This makes it the strongest single-target non-ultimate nuke in the game.

Last Will (Necronomicon Warrior)

* Attack type Hero, Damage type Magic
* This is the ability on the Necrominion summon that damages the unit or hero that kills it.

Lvl? Death (Doombringer)

* Attack type Spells, Damage type Normal
* This only applies to the 250 bonus damage done by the spell on the correct levels. The other damage is attack type spells and damage type magic by default, so it will only be affected by spell resistance.

Maledict (Witch Doctor)

* Attack type Spells, Damage type Magic
* Damage is based on the difference between the target's current HP and its HP when Maledict was cast.

Mana Void (Anti-Mage)

* Attack type Spells, Damage type Magic

Meat Hook (Butcher)

* Attack type Spells, Damage type Enhanced (Physical, but does not apply armor)

Nightmare (Bane Elemental)

* There is an extremely small initial 5 damage using attack type Spells and damage type Magic
* The 'damage' on top of that just takes the health directly from the target.

Nether Strike (Spirit Breaker)

* Attack type Spells, Damage type Normal
* This spell has a one second casting delay.

Omnislash (Juggernaut)

* Attack type Hero, Damage type Normal
* This applies to the 3/5/8 "triggered" slashes which deal 150-250 damage. If Yunero's attack speed is fast enough, he may make regular attacks between the slashes.

Paralyzing Cask (Witch Doctor)

* Attack type Spells, Damage type Normal
* This refers to the 75 damage that Paralyzing Cask deals to each non-hero unit that it hits.

Penitence (Holy Knight)

* Attack type Hero, Damage type Normal
* When Penitence is cast, it creates a temporary trigger that fires when its target is damaged. What's interesting about Penitence is that it does increase the damage done by spells, but when it does, the 32% bonus damage is dealt as physical damage that gets reduced by armor instead of by the hero's spell resistance. Desolator on Chen? Slardar or Nevermore and Chen a good combo? Maybe..

Purification (Omniknight)

* Attack type Spells, Damage type Normal
* Purification damage is trigger based. However, Purification damage becomes highly ineffective on heroes later on because it's affected by both hero spell resistance and hero armor.

Quill Spray (Bristleback)

* Attack type Hero, Damage type Normal

Reaper's Scythe (Necrolyte)

* Attack type Spells, Damage type Fire (Magical)

Remote Mines (Techies)

* Attack type Spells, Damage type Fire (Magical)
* Damage done by Remote Mines is triggered, and the area of the remote mines increases slightly from 425 to 435 to 450.

Return (Centaur Warchief)

* Attack type Hero, Damage type Normal
* This only applies to the damage done by triggers when the Centaur is attacked, not the initial damage done to melee units. This passive is extremely inneffective against Agility heroes because of their high armor and natural spell resistance.

Reverse Polarity (Magnataur)

* Reverse Polarity is a hard-coded War Stomp that moves all nearby units onto the caster when it resolves.

Rupture (Bloodseeker)

* Attack type Hero, Damage type Magic
* This attack and damage type applies to both the initial damage and the damage taken by moving.
* The distance the target has traveled is checked every quarter of a second.
* If the hero has traveled far enough to deal himself 200 damage, all of that damage is negated (1000/500/333.3~ is the minimum distance to avoid damage).

Sanity's Eclipse (Obsidian Destroyer)

* Attack type Spells, Damage type Magic

Scattershot (Sniper)

* This spell's damage is done by dummy units and not by triggers.
* The dummy units use attack type Piercing, and, by default, damage type Normal.
* Each pellet has 200 area of effect and strikes in a random spot in Scattershot's area of effect.

Shadowraze (Shadow Fiend)

* Attack type Spells, Damage type Death (Magical)

Shadow Wave (Shadow Priest)

* Attack type Hero, Damage type Normal
* This is the damage dealt to all enemy units within 180 AOE of the healed unit.

Shadow Word (Warlock)

* Attack type Hero, Damage type Divine (Magical)
* When cast on allies, Shadow Word also heals for the full stated amount.

Shallow Grave (Shadow Priest)

* Attack type Hero, Damage type Normal
* This is the damage dealt to the killer of a unit with the Shallow Grave buff if the killer is a hero

Spectral Dagger (Spectre)

* Attack type Spells, Damage type Magic

Spirit Bear (Lone Druid)

* Attack type Spells, Damage type Normal
* This is the damage dealt to the owner of the Spirit Bear when it dies. The damage is reduced by both spell resistance and armor, so killing that huge bear isn't really all that rewarding in that aspect.
* However, killing the bear makes his owner lose 1/1.3~/2/4% of his total experience.

Starfall (Priestess of the Moon)

* Attack type Spells, Damage type Magic

Static Field (Lord of Olympia)

* Attack type Spells, Damage type Magic
* Static Field's effects occur before those of whatever spell was cast to trigger it.

Test of Faith (Holy Knight)

* Attack type Hero, Damage type Magic

Toss (Stone Giant)

* Attack type Spells, Damage type Demolitions (Physical, but unaffected by armor)
* Toss picks a random unit within 275 of Tiny to be thrown. It throws it to the point targeted, not the unit. It overshoots seemingly randomly because of the inherent randomness in polled waits (if they worked out perfectly, it'd land exactly on the spot; polled waits are always longer than what they are set for) (I had misread the effects of Tiny the first time I posted about him).
* The thrown unit receives 20/35/50/65% of the stated Toss damage for levels 0/1/2/3 of Grow!. If the thrown unit is an enemy, it also receives the regular Toss damage.

Waveform (Morphling)

* Attack type Spells, Damage type Magic

Wild Axes (Beastmaster)

* Attack type Spells, Damage type Normal Tweet This

Dota-Allstars Critical & Bash Guide

guidBoth critical strikes and bashes stack with diminishing returns, as according to the formula:

1 - ( 1 - A ) * ( 1 - B ) * ( 1 - C ) .... ( 1 - X ) = Chance to bash / critical strike

where A, B, C and so forth are the seperate chances for each item or skill that can bash / critical strike.

When calculating damage from critical strikes, if two occur at once, only the last critical strike skill or item you achieved will have effect. Skills are only counted as achieved when they are learnt for the first time.

When calculating bashes, it depends on whether you're a melee or ranged hero. It is universal though that if the bash time you should apply is less than the bash time the opponent currently has left, then no change in the bash time will be made.

Melee heroes' bashes stack fully, where if two bashes occur at once, the longest stun time from all of the bashes, and each and every seperate bash's damage will work. The damage is reduced by armour type spell resistance (and eliminated by magic immunity), but the stun is not blocked by magic immunity. The damage is counted as a seperate source, and does thus not affect lifesteal, nor is it affected in any way by criticals.

As for ranged heroes, if two bashes occur at once, only the bash time and damage from the last bash skill or item you got will work. The damage is hero type physical damage, that means it's not blockable by magic immunity and it's reduced by armour type hero resistance and armour value. The stun, however, is blockable by magic immunity. The damage is added as your normal damage, but will be skipped if a critical triggers after it (essentially the damage you deal will be BaseDamage*CritMultiplier). If the bash instead triggers after the critical, the damage will be added after the critical strike has multiplied the normal damage. (BaseDamage*CritMultiplier + BashDamage)

Note: As of 6.28, Banehallow does not count as a ranged hero in his ultimate form. As of 6.44, Ursa no longer counts as a ranged unit either.

As it seems some people have misinterpreted what I've said, I'll try to clarify a bit more.
When it comes to bashes on melee heroes, the formula above only tells you the percentage to get at least one bash on an attack. As melee heroes can get multiple bashes on each attack, all bashers can still trigger on the very same attack, meaning that they would all do their bonus damage, but only the longest stun time would be used. This in turn means that on melee heroes, the damage you get from a basher does not decrease if you get more bashers. Tweet This

Dota-Allstars Images Guides

Item Effects on Images

The following is an attempt to answer people's questions about what to buy for imager heros into one topic. These heros include terrorblade, naga siren, phantom lancer and chaosknight.

Some items and orb effects work on images. Some do not. Therefore to maximise the potential of your imager hero it pays to do some research. If you build your imager hero right they are amongst the most powerful late game heros in Dota. If not you will just have one relatively weak hero that can only use their images for distraction purposes.

I intend to update this page as more information comes to hand so any comments, corrections and information appreciated!

The following items and effects DO work on images
  • Stat bonus items. Images gain hit points from strength, armour and attack speed from agility, and bonus to damage from your primary stat. I believe they also gain hitpoint and mana regeneration from stats as well.
  • Feedback (Diffusal Blade/ Manta Style). Only works on melee images. Ranged images do not burn mana.
  • Critical Strike (Crysallis / Buriza ). Just the critical strike ability is transferred to images not the bonus damage from the item.
  • Evasion (Butterfly, Radiance)
  • Raw movement speed gain items (Boots, Treads, Teleboots)
  • % Movement Speed gain items (Sangeyasha, Yasha).
  • True Sight (Gem of True Sight)
  • Radiance burning aura (Radiance) - Note that while images get the burning aura only one such aura will apply to an enemy at a given time (i.e. 4 images do not mean 4xdamage from the burn aura). Also note that only the aura damage and evasion bonus transfers to images. The bonus damage from the Radiance item itself does not transfer.
  • Direct Hit Point bonus items (Vitality Booster, Point Booster, Soul Booster, Heart of Tarresque, Manta Style)
  • Direct Mana Point bonus items (Energy Booster, Point Booster, Soul Booster, etc)
The following items and effects do NOT work on images
(despite what the attack animation might suggest!)
  • Direct bonus to damage items (i.e. items that say +x to damage do not give that bonus damage to images)
  • Direct bonus to armour items (Chainmail, Platemail, Aegis etc). Note: Java's Premium Naga Siren Guide says the opposite so I am prepared to be corrected on this point!
  • Direct regeneration items (Ring of Regen, Ring of Health etc)
    Increased Attack Speed percent (Hyperstone, Treads, Hand of Midas, Monkey King Bar, Butterfly)
  • Lifesteal (Satanic, Mask of Madness, Mask of Death, Helm of Dominator)
  • Frost Attack (Eye of Skadi)
  • Chain Lightning (Maelstrom)
  • Cleave - Percentage Splash Damage applied to nearby targets (Battlefury)
  • Bash - % chance to stun (Cranial Basher). To be precise it is a bit more complicated than just saying it doesn't work - see notes below.
  • Maim (Sange, Sangeyasha)
    % Chance for Microstun that disrupts concentration spells and gives bonus damage (Monkey King Bar)
  • Corruption effect - minus to armour upon hit (Stygnian Desolator). Bear in mind however the images will benefit from the corruption given by your main hero so it's still a decent option
  • Return damage % from melee attackers (Blademail
  • Damage block (Kraken Shell, Stout Shield, Vanguard)
  • Spell items - images can't cast spells (Dagon, Ginsoo, Mechanism, Mantastyle, BKB etc)
  • Magic resistance items (Planewalker Cloak, Aegis) - images only get innate hero resistance.


The following items have not yet been tested. 

Please advise if you test any of these out (include details of the test you carried out to prove it). Note: most of the below are auras but you should note that the image showing the aura icon or visual effect is NOT the same thing as it actually working on the image. The image will always show the aura icon regardless

  • Spell block (Linkens)
  • Lifesteal Aura (from Leoric or Vladmir's Offering)
  • Devotion Aura (Ring of Basilus or Vladmir's Offering)
  • Brilliance Aura (Crystal maiden, Ring of Basilus or Vladmir's Offering)
  • Toughness Aura (Sven)
  • Healing Aura (Headress of Rejuvenation, Mechanism)
  • Mechanism Heal Activation Effect
  • Arcane Ring Mana Charge Activation Effect
  • Buckler Activation Effect
  • Attack Speed Buff Aura (Assault Cuirass)


 Extra note on bashing with images

Illusions can bash, but it works in a really strange way. First of, they won't deal any bonus damage.Secondly, if an image bashes a target, it will only be a fake bash. Everything will look as it would if a real hero bashed the target, but the target can still move and attack. If a real hero bashes the target while he is in such a "Fake bash state", the fake bash state will be prolonged. Vice versa, if a hero makes a real bash on the target, and an image bashes the target, the real bash will be prolonged.


Tweet This

Dota Recipe - Dota-Allstars Recipe Guide

Feel free to notify me if there's a mistake or typo


Protectorate 

Assault Cuirass (5550)
+10 armor, +35% attack speed
+5 armor aura, +20% attack speed aura (allies), -5 armor aura(enemy)
Requires : Platemail (1400), Chainmail (550), Hyperstone (2100), Recipe (1500)


Heart of Tarrasque (5500)
+40 Strength, 2% HP regen (not stack, only regenerates when not taken damage from player units for 6 seconds), +300 HP
Requires : Messerschmidt's Reaver (3200), Vitality Booster (1100),
Recipe (1200)


 Black King Bar (3900)
+10 Strength, +24 damage
Avatar (active)
immune spell for 10/9/8/7/6/5 seconds duration
80/75/70/65/60/55 seconds cooldown seconds
Requires : Ogre Axe (1000), Mithril Hammer (1600), Recipe (1300)


 Shiva's Guard (4700)
+15 armor, +30 inteligence, -15% attack speed aura
Arctic Blast (active)
-40% movement speed, deal 200 damage
100 mana, 30 seconds cooldown
Requires : Platemail (1400), Mystic Staff (2700), Recipe (600)


Bloodstone (5050)
+500 hp, +400 mana, +150% mana regen, +6 hp regen
When nearby enemy hero dead (1000 AoE), gain 1 charge. Each charge give 1 Mana regen. Loses a third charges per death (rounded down). Restore 400 + 30 x charges HP to nearby allies (1700) when die. Gold lost on death is reduced by 25 per charge. Respawn time reduced by 3 seconds per charge.
Requires : Soul Booster (3300), Perseverance (1750)


Linken's Sphere (5175) 
Blocks most targetted spells once every 20 seconds (passive)
+6 HP regen/second, +150% mana regen, +15 All Stats
Requires : Perseverence (1750), Ultimate Orb (2100), Recipe (1325)


Vanguard (2225)
+6 HP regen/second, +275 HP
+70% chance to block 40 damage (20 damage for ranged heroes)
Requires : Ring of Health (875), Vitality Booster (1100), Stout Shield (250)


 Blade Mail (2200)
+22 damage, +5 armor, +10 intelligence
Damage Return (active)
return 100% damage as magical damage
Duration 4 seconds, Cooldown 25 seconds,Manacost 25
Has visual effect to show when it is active
Requires : Broadsword (1200), Chainmail (550), Robe of the Magi (450)


Soul Booster (3300)
+450 HP, +400 mana
+10% mana regen, +1HP regen/seconds
Requires : Vitality Booster (1100), Energy Booster (1000),
Point Booster (1200)


Hood of Defiance (2150)
+30% spell resistance, +8 hp regen
Requires : Planeswalkers Cloak (500), Helm of Iron Will (950),
Ring of Regeneration x2 (700) or Ring of Health (875)


Arcane Sanctum


Guinsoo's Scythe of Vyse (5675)
+35 Intelligence, +200% mana regen, +10 Strength, +10 Agility
Hex (active) turn enemy into sheep for 3.5 seconds
100 mana, 35 seconds cooldown
Requires : Ultimate Orb (2100), Mystic Staff (2700), Void Stone (875)


Orchid Malevolence (5025)
+20 inteligence, +45 damage, +30% attack speed, +225% mana regen
Soul Burn (active) 5 seconds silence, amplify 20% damage
25 seconds cooldown, 100 Mana
Requires : 3 x Oblivion Staff (3 x 1675)


Eul's Scepter of Divinity (2800)
+10 Intelligence, +125% Mana regen , +25 Movement Speed
Cyclone (active) cast cyclone on 1 enemy/self for 2.5 seconds
75 mana, 30 seconds cooldown

Requires : Staff of Wizardry (1000), Void Stone (875), Sobi Mask (325), Recipe (600)


Force Staff (2200)
+10 Intelligence, +10 Damage, +10% Attack Speed
Force (active) push any unit 600 units into the direction it's facing
25 mana, 20 seconds cooldown

Requires : Staff of Wizardry (1000), Quarter Staff (900), Recipe (300)


Dagon (2750)
+12 Intelligence, +9 damage, +3 All Stats
Energy Burst (active) 400 damage to single target
180 mana, 40 seconds cooldown, can be upgraded (4x)
Requires : Staff of Wizardry (1000), Blades of Attack (450), Recipe (1300)
Upgrade per level : -20 mana cost, -4 seconds cooldown, +100 damage, +2 intelligence


Necronomicon (2700)
+15 Intelligence, +6 Strength
Demonic Summoning (active) Summon 2 Demon with special abilites
50 mana, 90 seconds cooldown, can be upgraded (2x)
Summons can't attack Ancient unit
Requires : Staff of Wizardry (1000), Belt Of Giant Strength (450), Recipe (1250)

Level 1 :
Warrior 400 hp, 21 - 21 normal damage, 6 heavy armor
Has Mana Break (burn 25 mana per hit) and Last Will (deals 200 damage to unit that kills it)
Archer 400 hp, 31 - 31 piercing damage, 6 heavy armor
Has Mana Burn (125 burned, 250 range) and Endurance Aura (increases nearby unit's movement and attack speed by 3%)

Level 2
+21 Intelligence, +10 Strength
Warrior 600 hp, 41 - 41 normal damage, 8 heavy armor
Has Mana Break(burn 50 mana per hit) and Last Will(deals 400 damage to unit that kills it)
Archer 600 hp, 61 - 61 piercing damage, 8 heavy armor
Has Mana Burn (175 burned, 250 range) and Endurance Aura(increases nearby unit's movement and attack speed by 6%)

Level 3
+24 Intelligence, +14 Strength
Warrior 800 hp, 61 - 61 normal damage, 10 heavy armor
Has Mana Break(burn 75 mana per hit), Last Will(deals 600 damage to unit that kills it), Magic Sentry (Increased vision range, also reveals nearby invisible units)
Archer 800 hp, 91 - 91 piercing damage, 10 heavy armor
Has Mana Burn (225 burned, 250 range), Endurance Aura(increases nearby unit's movement and attack speed by 9%)


Aghanim's Scepter (4300)
+10 all attributes, +200 HP, +150 Mana
Improves Ultimates for Lord of Avernus, Bane Elemental, Earthshaker, Holy Knight, Clockwerk Goblin, Shadow Priest, Sacred Warrior, Invoker, Juggernaut, Tormented Soul, Slayer, Demon Witch, Moon Rider, Necrolyte, Nightstalker, Pandaren Brewmaster, Butcher, Oblivion, Queen of Pain, Shadow Shaman, Crystal Maiden, Spiritbreaker, Sand King, Twin Head Dragon, Undying, Vengeful Spirit, Venomancer, Faceless Void, Windrunner, Witch Doctor, and Lord of Olympia.
Requires : Point Booster(1200), Recipe (1100) and 2 of the following (choose 2 from 3): Ogre Axe (1000), Blade of Alacrity(1000), Staff of Wizardry (1000)


Refresher Orb (5300)
+5 HP regen/second, +200% mana regen, +40 damage
Reset Cooldown (active) all ability cooldowns turn to 0
375 mana, 210 seconds cooldown
Requires : Oblivion Staff (1675), Perseverance (1750), Recipe (1875) Tweet This

Dota-Allstars Frequently Asked Question (FAQ)

Q: How do I get lumber?
A: You do not need lumber for anything. All items which recipes cost one lumber do not need a recipe to be created. It will instead automatically merge when you have the listed items. The recipe merely functions as a way to see what you need to make the item, what it does, and so on.

Q: Why does the computer not do anything?
A: There is no support for computer controlled players in the official DotA Allstars. There is a sanctioned AI version (they have our permission, but the map is not supported by us) which can be found here.

Q: Does evasion stack?
A: No. Higher chance evasion overrides lower chance evasion. However, Faceless Void's Backtrack and Spectre's Dispersion stacks with evasion, with diminishing returns, in the sense of avoiding damage. Use the formula 1 - ( 1 - A ) * ( 1 - B ), where A and B is your chance to evade, as well as your chance to backtrack or disperse.

Example:
A is Butterfly's 30% evasion, and B is Faceless Void's Backtrack at level 3 at 20% chance.
1 - ( 1 - 0.3 ) * ( 1 - 0.20 ) = 0.44= 44% evasion.
You can copy+paste "1 - ( 1 - 0.3 ) * ( 1 - 0.20 ) =", without the quotes, into Windows Calculator, and it will compute it for you.

Q: How much spell resistance do heroes have?
A: Heroes have 25% spell damage resistance, without any skills or items. To calculate it with items, use 1 - ( 1 - A ) * ( 1 - B ) where A and B are the seperate spell damage reduction percentages. Spell damage resistance does not stack from multiple items.

Example:
A is hero type armour spell damage reduction of 25%, and B is Planeswalker's Cloak spell damage reduction of 15%.
1 - ( 1 - 0.25 ) * ( 1 - 0.15 ) = 0.3625 = 36.25% spell damage reduction.
You can copy+paste "1 - ( 1 - 0.25 ) * ( 1 - 0.15 ) =", without the quotes, into Windows Calculator, and it will compute it for you.

Q: Spell damage? Magic damage? Is it not the same?
A: No, there are a few differences. Spell damage is usually reserved for offensive spells, and is only reduced by the target's spell resistance. Magic damage is, however, usually a normal attack type, which is reduced by the target's magic resistance as well as the target's armour value. Refer to the Triggered Spells Guide for a more in-depth explanation.

Q: How do critical strikes stack?
A: The damage from two critical strikes will never stack, but the chance to get a critical strike will. Use 1 - ( 1 - A ) * ( 1 - B ) to calculate your chance to critical strike, where A and B are the seperate chances to get a critical strike. For a more in-depth explanation, including how the damage is dealt, read Critical Strikes and Bashes

Q: Does Battlefury work on ranged heroes?
A: The cleave damage from the Battlefury will not work, but everything else will work as normal.

Q: Do orb effects stack?
A: You may only have one orb effect. For a more detailed explanation, refer to The Complete Orb Effect Priority Table

Q: How does increased attack speed work?
A: Increased attack speed (IAS) works as a multiplier on your attacks per second. If you have 10% increased attack speed (IAS), you will attack 10% faster than if you had no increased attack speed. If you have 20% IAS, you will attack 20% faster than if you had no IAS, etc. Refer to The Attack Speed Guide for a more thorough explanation.

Q: What is backdooring?
A: Backdooring is, generally, when a player attacks the opposing team's buildings, without the assistance of creeps.

Q: What does one point of agility/strength/intelligence give me?
A: Each point of strength gives you 19 hit points and regenerates 0.03 hit points per second.
Each point of agility gives you 1% IAS and 0.14 armour points.
Each point of intelligence gives you 13 mana and regenerates 0.04 mana per second.

Q: How does cleave damage stack?
A: Battle Fury's cleave damage will stack additively with any other cleave damage, be it from another Battle Fury or from an ability. Two Battle Furies will give you 70% cleave damage. Cleave damage is calculated before any reductions on the target but after modifications from the attacker (e.g. critical strikes). Cleave damage is dealt as the same type of damage your normal attack is.

Q: Can you really windwalk (via Lothar's edge) while casting a channeling spell?
A: Yes. This requires some timing, but it is possible. (Hit wind walk immediately after the channeling spell.) This is not considered an exploit. The combination to make this famous is Vol'Jin and his channeling death ward while windwalking.

Q: How does Omnislash work?
A: Each of the slashes in Omnislash (we will refer to these as 'the omnislashes') deals 150 - 250 damage. There is about a quarter of a seconds wait in between each slash. During that wait time you have the possibility to use your normal attack, if your attack speed is high enough. The normal hits work exactly as your normal attacks do, as in that they can use orb effects, they can bash, they can achieve critical strikes, they can cleave damage, etc. while the omnislashes only deal the set amount of damage.

Q: How much experience do you get for a hero kill?
A: Level 1 to 5 gives you 100 / 120 / 160 / 220 / 300 experience, and each level after that adds another 100 experience, for a total of 2300 experience for killing a level 25 hero.

Q: When do runes spawn?
A: Runes spawn every 2 minutes, starting at 00:00, only if there is no rune already spawned. Whether it spawns in the upper part or the lower part of the river is random.

Q. How often are trees respawn?
A: Trees respawn every 5 minutes

Q. How often is a creep wave spawned?
A: Every 30 seconds game time starting from 00:00.

Q. How often do creeps get an increase to their hitpoints?
A: Creeps get 10 more maximum HP every 7 minutes and 30 seconds.

Q. How often is a creep added to the wave when increased?
A: Every 20 minutes for melee creep, Every 60 minutes for ranged creep.

Q. How much experience do creeps give?
A: Melee creeps give 62 XP before their barracks is destroyed and 41 XP after (Ancient of War/Crypt).
Ranged creeps give 41 XP before their barracks is destroyed and 25 XP after (Ancient of Lore/Temple of the Damned).
Siege creeps give 88 XP and are unaffected by barracks destruction.

Q. What is the rate of gold generation?
A: Players get 8 gold every 7 seconds. If the game mode is -em, players will receive an additional 8 gold every 7 seconds after -em was initially typed.

Q. What is the Gold gain based on the number of deaths or kills in a roll?
A: The amount of gold gained is 100 gold + 100 + 5/lvl of hero killed + bonus; Bonus ranges from 0-400 and increases in increments of 50 gold per each additional kill after the godlike status is achieved.

Q. What is the amount of gold loss for dying?
A: Gold lost for dying is 30*hero level.

Q. What is the maximum speed limit?
A: 522 movespeed

Q. Does Vladmir's Offering stack with N'aix's, Skeleton King's, Broodmother's, or Satanic's lifesteal?
A: Yes. Vladmir's Offering is not an orb effect. It is an aura. Auras stack with orb effects. Auras with different buffs stack.

Q: Where can I download the latest version?
A: www.getdota.com

Q: Where can I find the latest DotA patch notes?
A: www.getdota.com/changelog.txt Tweet This

Dota-Allstars Experience Guides

What is Experience and why is it so important? Experience is an extremely important part of the game. It's the sole thing that levels up heroes and makes them stronger and unlocks new skill points to use. There are many ways to gain experience, the following are all of them.

  1. Killing Creeps.
  2. Killing Neutral Creeps (Roshan Included).
  3. Killing Towers and Enemy Buildings.
  4. Killing Enemy Heroes.
  5. Killing Enemy Heroes' Summoned Units.
  6. Killing Special Creep.
  7. Getting Creep Denied by an Enemy.
     
Anyways some key things about experience.
  1. Experience is given in a 1000 AoE from the unit that was killed.
  2. Experience is sharely evenly among all allied heroes within that 1000 AoE
  3. In -EM All experience values are multiplied by 1.5
  4. Using the Bloodstone Item will give you experience in the area in which you died until you revive.
  5. Chen's dominated creeps will give regular Neutral Creep values, but if those creeps are Enchanted or Dominated via HoD, then their experience values will decrease (I'll add in the charts later).
  6. Techie's Wards/Mines and Pugna's Wards do not give Experience. Observer Wards and Sentry Wards do not either.
Now I'm sure you guys should have some idea of what "denying" is. If not I'll explain it to you with regards to experience. Denying refers to when you kill your own creep or building, to deny the enemy of getting experience as well as gold. Why is this important? Because if you constantly deny your enemy of experience, you'll end up at a higher level then them and you'll probably have more gold as well. As we all should know, outleveling a hero in your lane is definitely a good thing. Now on to the actual mechanics of "denying."

  1. First of all, there's no difference in Denial Experience if you're playing EM or Non-EM
  2. Denies grant XP ONLY if the killed unit is owned by scourge or sentinel, player owned units do NOT grant any XP, when denied. (Thanks Erazer).
  3. All denies grant the same amount of experience, but it varies if you're a melee hero or a ranged hero.
  4. A denied unit grants 36/n experience for melee heroes and 18/n for ranged heroes, where n is the number of heroes within a 1000 AoE.
  5. Other methods of denying such as Death Pact, Dark Ritual and Conversion will not grant experience to the enemy at all.
Now on to actual numbers. The following is pretty much the basic numbers to experience. What experience do you gain levels at, the amount of experience in between levels you need to level up, the amount of experience you gain for killing a level X hero etc.

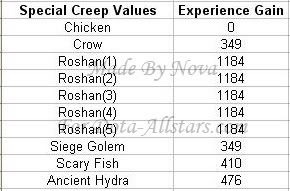
Now these creeps are "special" creeps. Roshan, Chicken/Crow, and Super Creeps are included.
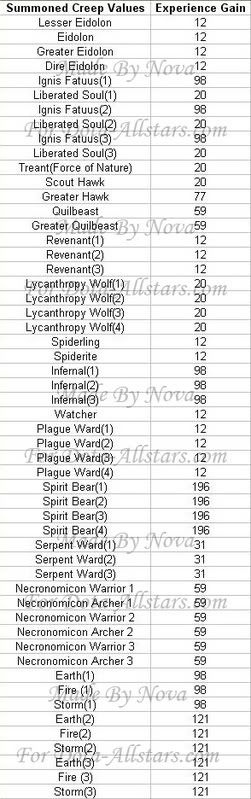
These creeps are "summoned" creeps which refer to creeps summoned by items or hero skills.
Tweet This

Dota-Allstars Orb Effect Guides

The two golden rules:
1: Orb effects will never stack.
2: You may only place one buff per attack.

And as an information sticker:
• You will only get the effect that is listed in the box. If you get both, it says both. If there's some strange mechanics to it, it's listed in the legend.
• Eye of Skadi will be a melee eye of skadi if the unit that picks it up is currently in melee form. It will be ranged if the unit that picks it up currently has a ranged attack. Switching forms may or may not affect the form of the Eye of Skadi, it depends on the ability that changes your range
• Ursa Warrior is as of 6.44 a melee unit. Doombringer is a melee unit. As of 6.28, Banehallow remains as a melee unit in his ultimate form. Strength Morphling is no longer in the game.

Maim: "Sange", "Sange and Yasha"
Lifesteal: "Mask of Death", "Mask of Madness", "Helm of the Dominator", "Satanic"
Feedback: "Diffusal Blade", "Manta Style"
Chain Lightning: "Maelstrom", "Mjollnir"
Corruption: "Stygian Desolator"
Cold Attack: Melee: "Eye of Skadi melee"
Cold Attack: Ranged: "Eye of Skadi ranged"


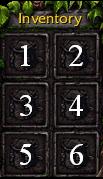
As seen in the ranged part, an Eye of Skadi and a Stygian Desolator would give you the Corruption orb effect, regardless of any other circumstances. However, on melee heroes, it says "Place". Looking in the legend, it tells you that "Place" means that the item in the highest priority slot will take effect, as well as the inventory priority order. I realize that my previous explanation may have been a bit ambiguous, so heres an image of the priority order:

Tweet This

Dota-Allstars Neutral Creeps Guide

Dota-Allstars Neutral Creeps Guide. This guide will help you locate neutral creeps and give you more detailed information about the neutral creeps.

General Knowledge
  • Controlled creeps can be easily killed with Devour (Lucifer - Doom Bringer) and Hand of Midas (doesn't work on Satyr Hellcaller).
  • Hand of Midas doesn't work on creeps dominated with Helm of the Dominator
  • Hand of Midas now work on level 6 Neutral Creeps
  • Creeps dominated by Helm of the Dominator can be heavily damaged by Purge (Diffusal Blade, Medusa - Gorgon and Satyr Trickster)
  • Dominated creeps can't be seen on the minimap, making them ideal for ganking. Only some are shown on the minimap as small dots (these are the high leveled creeps, meaning the Polar Furbolg Ursa Warrior, Satyr Hellcaller and Centaur Khan).
  • Ancients and Golems can't be dominated.
  • Placing wards (observer or sentry) and any friendly unit on the neutral creep camp will prevent them from spawning.
  • Roshan spawns immediately at the start of the game.
  • Neutral creeps spawn at the minute mark from minute 00:30 onwards.
  • Neutral creeps always respawn at the minute mark (Roshan spawns 10 minutes after being killed). Meaning, for example, you kill a creep group at the 45th second of a minute. Quickly get out of the area and you just have to wait 15 seconds for the creeps in that area to spawn again. It is important you get a fair distance away though, else they won't spawn. Very useful for timing neutral creep farming.
  • Being an Ancient doesn't mean the creep is spell immune. Creeps that aren't immune to all spells are the Black Drake, Dragonspawn Overseer and Sorcerer.
  • Creeps will not spawn at their camp spots if there are remains of any corpse. The trigger that's used to activate spawning is that the area is completely empty.
Neutral Creeps Map

This is the complete list of neutral creeps and their location.

Easy Neutral Creeps

Groups 1
Location: A1, A2

2 Forest Troll Berserker (Level 2)
HP 500, Damage 28-37, Range 500, Armor 1
Exp 41, Gold 22-26

Kobold Taskmaster (Level 2)
HP 400, Damage 24-27, Range 100, Armor 0
Speed Aura (+12% Movement Speed to Nearby Allies)
Exp 41, Gold 31-37

Total Exp: 123
Total Gold: 75-89


Groups 2
Location: A1, A2

3 Gnoll Assassin (Level 2)
HP 370, Damage 28-36, Range 500, Armor 1 
Envenomed Weapon - 2 damage for 20 seconds
Exp 41, Gold 26-34

Total Exp:123
Total Gold:78-102


Groups 3
Location: A1, A2

Kobold Taskmaster (Level 2)
HP 400, Damage 24-27, Range 100, Armor 0
Speed Aura(+12% Movement Speed to Nearby Allies)
Exp 41, Gold 31-37

Kobold Tunneler (Level 1)
HP 325, Damage 14-15, Range 100, Armor 1
Exp 25, Gold 17-19

3 Kobold (Level 1)
HP 240, Damage 10-11, Range 100, Armor 0
Exp 25, Gold 7-9
Total Exp: 141
Total Gold:69-83


Groups 4
Location: A1, A2

2 Forest Troll Berserker (Level 2)
HP 500, Damage 28-37, Range 500, Armor 1
Exp 41, Gold 22-26

Forest Troll High Priest (Level 2)
HP 450, MP 300, Damage 25-32, Range 600, Armor 0
Heal (5 Mana) - Heal 15 HP
Exp 41, Gold 21-25

Total Exp: 123
Total Gold:65-77

Groups 5
Location: A1, A2

2 Fel Beast (Level 2)
HP 400, Damage 14-15, Range 100, Armor 1
Exp 41, Gold 20-23

Ghost (Level 3)
HP 500, MP 400, Damage 30-35, Range 300, Armor 1 
 Frost Attact (12 Mana) - Slow movement speed and attack speed 20%
Exp 62, Gold 30-40
Total Exp: 144
Total Gold:70-86


Medium Neutral Creeps

Groups 6
Location: B1, B2, B3, B4, C1, C2, C3, C4

Centaur Khan (Level 5)
HP 1100, MP 200, Damage 49-55, Range 100, Armor 4
Hoofstomp (100 Mana) - Stuns 2 seconds, 25 damage, 200 AoE
Endurance Aura (+15% Attack Speed to Nearby Allies)
Exp 119, Gold 76-88

Centaur Outrunner (Level 2)
HP 550, Damage 18-21, Range 100, Armor 2
Exp 41, Gold 20-24

 
Total Exp:160
Total Gold:96-112

Groups 7
Location: B1, B2, B3, B4

2 Giant Wolf (Level 3)
HP 500, Damage 21-24, Range 90, Armor 2
Critical Strike - 20% chance 2x damage
Exp 62, Gold 27-31

1 Alpha Wolf (Level 4)
HP 600, Damage 30-33, Range 90, Armor 3
Critical Strike- 20% chance 2x damage
Command Aura - 30% extra damage to nearby allies
Exp 88, Gold 37-45
Total Exp:212
Total Gold:91-107

Groups 8
Location: B1, B2, B3, B4

2 Satyr Soulstealer (Level 4)
HP 600, MP 400, Damage 24-27, Range 100, Armor 1
Mana Burns (50 Mana) - Burn 100 mana
Exp 88, Gold 31-37

2 Satyr Trickster (Level 2)
HP 240, MP 200, Damage 7-10, Range 600, Armor 0
Purge (75 Mana) - Slow by factor of 5 for 5 sec
Exp 41, Gold 15-17


Total Exp:258
Total Gold:92-108


Groups 9
Location: A4,B1

2 Ogre Mauler (Level 2)
HP 850, Damage 24-27, Range 100, Armor 1
Exp 41, Gold 23-47

Ogre Magi (Level 3)
HP 600, MP 400, Damage 24-27, Range 100, Armor 0
Frost Armor (40 Mana) - Add 8 Armor, 5 sec slow melee attacker, 45 sec duration
Exp 62, Gold 43-49

Total Exp: 144
Total Gold:89-143

Groups 10
Location: B1, B2, B3, B4

2 Mud Golem (Level 5 - Unconvertable)
HP 800, MP 400, Damage 29-33, Range 100, Armor 4
Exp 119, Gold 54-62

Total Exp: 238
Total Gold:108-124


 Hard Neutral Creeps

 Groups 11
Location: B1, B2, B3, B4

Satyr Hellcaller (Level 6)
HP 1100, MP 300, Damage 49-55, Range 100, Armor 0
Shockwave (100 Mana) - 100 damage in a line
Unholy Aura (+3 HP regen to Nearby Allies)
Exp 155, Gold 107-121

Satyr Soulstealer (Level 4)
HP 600, MP 400, Damage 24-27, Range 100, Armor 1
Mana Burns (50 Mana) - Burn 100 mana
Exp 88, Gold 31-37

Satyr Trickster (Level 2)
HP 240, MP 200, Damage 7-10, Range 600, Armor 0
Purge (75 Mana) - Slow by factor of 5 for 5 sec
Exp 41, Gold 15-17


Total Exp:284
Total Gold:153-175


 Groups 12
Location: C1, C2, C3, C4

Polar Fulborg Ursa Warrior (Level 5)
HP 1100, MP 300, Damage 49-55, Range 100, Armor 4
Thunder Clap (100 Mana) - Slow 25% for 3 seconds, 150 damage, 200 AoE
Exp 119, Gold 76-88

Polar Fulborg Champion (Level 4)
HP 950, MP 200, Damage 39-44, Range 100, Armor 5
Exp 88, Gold 60-70

Total Exp:207
Total Gold:136-158


 Groups 13
Location: C1, C2, C3, C4

Enraged Wildkin (Level 5)
HP 950, MP 400, Damage 50-56, Range 128, Armor 4
Tornado (200 Mana) - Slow and damage an area for 30 seconds , channeling.
Exp 119, Gold 67-87

2 Wildkin (Level 1)
HP 350, Damage 20-25, Range 128, Armor 2
Exp 25, Gold 15-20

Total Exp: 169
Total Gold:97-127


Groups 14
Location: C1, C2, C3, C4

Dark Troll Warlord (Level 6)
HP 1100, MP 550, Damage 49-54, Range 300, Armor 1
Ensnare (150 Mana) - Bound target unit for 1.5 seconds
Raise Dead (50 Mana) - Raises 2 Skeletons (250 HP, 24-25 damage) from corpses
Exp 155, Gold 54-62

2 Dark Troll (Level 3)
HP 500, Damage 24-27, Range 300, Armor 0
Exp 62, Gold 26-33
Total Exp: 279
Total Gold:106-128


Ancients


Groups 15
Location: D1, D2

Elder Jungle Stalker (Level 6 - Unconvertable)
HP 2000, Damage 56-78, Range 128, Armor 4
Exp 155, Gold 152-170

2 Jungle Stalker (Level 5 - Unconvertable)
HP 1300, MP 400, Damage 46-64, Range 128, Armor 2
Exp 119, Gold 52-70

Total Exp: 393
Total Gold:256-310

Groups 16
Location: D1, D2

Blue Dragonspawn Sorcerer (Level 3 - Unconvertable)
HP 675, MP 400, Damage 33-38, Range 100, Armor 0
15% Evasion
Exp 62, Gold 74-82

2 Blue Dragonspawn Overseer (Level 5 - Unconvertable)
HP 1200, MP 400, Damage 59-65, Range 100, Armor 1
Devotion Aura (+3 armor to Nearby Allies)
15% Evasion
Exp 119, Gold 86-98

Total Exp: 300
Total Gold:246-278

Groups 17
Location: D1, D2

Black Dragon (Level 6 - Unconvertable)
HP 2000, Damage 70-94, Range 500, Armor 6
50% Splash Attack
Exp 155, Gold 164-234

2 Black Drake (Level 3 - Unconvertable)
HP 950, Damage 49-56, Range 500, Armor 2
Exp 62, Gold 44-56

Total Exp: 279
Total Gold:252-346

Groups 18
Location: D1, D2

Granite Golem (Level 6 - Unconvertable)
HP 2000, MP 600, Damage 77-87, Range 128, Armor 8
Exp 155, Gold 107-121

2 Rock Golem (Level 5 - Unconvertable)
HP 800, MP 400, Damage 29-33, Range 100, Armor 4
Exp 119, Gold 54-62

Total Exp: 393
Total Gold:215-245


Roshan

Movement Speed: Average
Attack Speed: Fast
Range: Melee, 400
EXP: 1184
Gold: 200 (all players on the team), 286-450 (individual)
HoM Gold: None

Abilities:
Spawns immediately at the start of the game.
At every respawn 10 mins after it is killed: +2000 hp, +25 damage, +2 armour
"Boulder" that deals 100 damage and stuns for 2 seconds.
"Thunder Clap" that deals 70 damage and slows movement and attack speeds of units for an amount of time.
"Reflect Damage" that reflects 20% damage back to melee units attacking it. Only available at 4th respawn onwards.
"Destroys Illusions" that attack it instantly.
Disentangle that dispels some targeted spells once every 15 seconds.
HP regen rate of 20 hp/sec.
Drops one charge of Aegis (stackable).
After 3rd respawn also drops Cheese (Heals, for 5 mana, 2500 hp and 1000 mana)

Highest Hand of Midas Gold Given
* Satyr Hellcaller -
284
* Enraged Wildkin -
270
* Centaur Khan -
236
* Dark Troll Warlord -
232
* Polar Furbolg Ursa Warrior -
230
* Polar Furbolg Champion -
203
* Mud Golem -
186
* Ogre Magi -
168
* Druid/Necro
(before upgrade) - 143
Tweet This
 

Dota Tips & Tricks Walkthrough © 2010 . Design By: imba D